Wednesday, January 8, 2014

Silly Thirty Reviews Cinema Secrets Brush Cleanser

Happy Wednesday everybody!

I'm here to discuss something important, something that the average woman talks about, but doesn't always get around to doing: Cleaning their makeup brushes.  It's kind of like re-organizing your sock drawer - you always say you will 'save it' to do on a rainy day when you have nothing else to do. Then it never gets done. Because honestly, who wants to spend a rainy day doing a tedious task like that?

For those of you who feel the same way about cleaning makeup brushes, or if you have never really cleaned your makeup brushes in the first place, then let me introduce you to Cinema Secrets Professional Brush Cleaner. 

(As you can see the packaging is very no-nonsense and gets down to business.)

I first learned about this product online. I think I Googled make up brush cleaning or something similar and found a video of a woman doing a demonstration with this stuff.  All she would do is pour the cleanser solution into a bowl, take a dirty brush, swish it around, and then wipe it on a paper towel and the brushes were good as new. I couldn't believe it was that simple. If I did not see the video, I don't think I would have tried it myself. 

Well, take it from me: this stuff works!  I have been using Cinema Secrets for about three years.  I went through about four or five of the eight ounce size bottles before I recently decided to "go big or go home" with the 32 ounce size that is pictured above. It was well worth it for me.  Cinema Secrets takes off - dissolves actually - all of the makeup from your brushes, while disinfecting and conditioning the brush hairs at the same time. 

So how does it work?  It is as simple as what I described above:

1. Take a bowl or a cup
2. Pour some of the cleanser into said bowl or cup
3. Take your dirty makeup brush and swirl it into the cleanser 
4. Wipe off all of the makeup onto a paper towel
5. Reshape your brushes and lay them flat on their side to dry

No need to rinse with water, once they are dry you are ready to go!

Don't let the bright blue color (Doesn't it look like the stuff that hairdressers use to sanitize combs?) of this stuff scare you - it won't stain your brushes or anything like that. As far as how it smells, if you are sensitive to heavy smells then this may not be the right cleanser for you - it has a heavy vanilla scent that stays with the brushes after cleaning.  The scent of it does go away after a few makeup applications.  Or, you just get used to it - I do not notice it anymore.

I have tried cleansers from MAC and Japonesque - the MAC cleanser is OK (the results from the MAC cleanser as far as how well it cleaned my brushes was similar to Cinema Secrets) but neither of these compares to Cinema Secrets. Cinema Secrets provides a quick and effective way to clean your makeup brushes.  You do not need to work so hard to get your brushes clean with this product.  Using the MAC cleanser, you still have to rinse the brushes with water and it becomes a process.  After trying the Japonesque cleanser, I found that it is better suited for quick cleaning if you have a limited amount of brushes and you need to use the same brush for two different colors, applications, etc. 

Here are a couple before-and-after photos of some of my brushes so that you can get a better idea of how well this product works: 


I would recommend this for anyone regardless of whether you think you have cheap, crappy makeup brushes that aren't worth the time and effort to clean, or if you have an expensive set that you would like to maintain.  The fact of the matter is you need to clean your makeup brushes regularly.  These things go on your face and around your eyes daily.  Think of how much bacteria and dirt they can harbor over time.  Also, your makeup will apply better and look better on your face when your brushes are clean.

You can find Cinema Secrets online at their website (click on the "Cinema Secrets" hyperlink), Amazon, and at beauty supply stores.  How do you clean your brushes?  Do you use Cinema Secrets? Let me know in the comments below!

Monday, January 6, 2014

Silly Thirty Cooking: Weight Watchers 2014 Edition

Happy New Year everyone!!!

So I ended up taking a little end of the year break from posting on the blog - it happens!  I feel like the holiday season started for me on October 1st.  Halloween came around with a vengeance - all of the candy and prospects of parties and festivities!  All I know is October 2013 for me was the month of chocolate. Then came November and December with a flurry of holiday parties and lunches and dinners.  November and December 2013 consisted of more chocolate, cheese, carbs and wine.  

Not that there is anything wrong with that, but I definitely had my fill of all sorts of rich foods and drinks. Needless to say on January 1st I was kind of disgusted with myself and everything I ate.  I was actually craving salads - you know its bad when your body just wants to nosh on lettuce and carrots!! 

With all the holiday eating, has come the holiday weight gain.  I feel it for sure and sometimes it seems to me at any moment when I look down that I will discover planets orbiting around my backside.  (An exaggeration I know, but isn't that a hilarious thought?)  I finally mustered up the courage to go on the scale the other day. What I saw on digital screen was quite scary - I now weigh 167.6 pounds.  

I don't think I have ever weighed that much in my life.  165 is usually the code red number for me on the scale.  So what would this be considered - code black?  Now, I know that some of it is water weight and wine weight, but still - that is a scary number for me.

I am not a small framed person - I have what could be considered a medium sized frame, so I can definitely put on some pounds before it becomes really noticeable (and my clothes start getting to tight!!), but to give you a frame of reference, here I am back in late November 2012 all gussied up for a formal event that I attend every year for work:


And here I am in late November 2013 all gussied up for the same event:


As you can see, there is a little bit of a difference.  I have a "fuller" look going on in 2013 that is the result of overindulgence at the breakfast, lunch and dinner tables.  In 2012, I looked more toned and fit and I would like to get back to that. 

So, for vanity (I'm not gonna lie about that) and health reasons, I am going to start on Weight Watchers.  I have used Weight Watchers off and on for the past four years or so, but never consistently, and never long enough for me to reach my "goal weight".  I guess you could say that my New Years Resolution for 2014 isn't so much losing weight, but following through with a plan in a consistent manner to see the results that I want to achieve.  

For those of you who don't know about Weight Watchers, you can find out about it on their website: www.weightwatchers.com.  But to give you a general idea , you are given a certain amount of "points" per day to use up/eat, and food is assigned a specific amount of points per serving.  You have to stay within your allotment of points per day, make sure to drink water, take a multivitamin and generally you will find that you will lose weight each week.   You have to record what you eat at each meal, so it keeps you accountable for your daily food intake.  There are no "bad" or "forbidden" foods - so it is up to you to use your judgment about how you want to eat your points.

The times that I have followed the Weight Watchers plan, it has worked for me - I have lost weight.  So now it is time to start it again, but this time I want to try to be more consistent with it through the entire year.  Historically, everything seems to go down hill for me come Memorial Day (bbqs, margaritas, and ice cream!), which then turns into autumn (stews, soups, hearty meals!), and then the winter and holidays (carbs, wine, carbs, wine!!!), and here we go again!!!  

I am going to check in with you on Fridays and give you the "low-down" on how I am doing - Am I staying within my points?  What kinds of things am I eating? Am I losing weight?  The hope I have right now, is that putting myself out there like this online to you guys will keep me on track and help me realize my goal.  

So, what exactly is my "goal "?  I just want to get down to between 140 and 145 pounds.  This number is not "too skinny" for me - in fact, it is within what would be considered a normal weight for me, BMI wise.  I almost did it before the beginning of summer 2012 - I was down to 147 pounds.  I was probably between 150 and 155 pounds when the 2012 picture you see above was taken.

So wish me luck everyone!  Obviously, as a result of all of this my food posts will be more health centered going forward with a few "cheat meal" ideas sprinkled in here and there.  

Is anyone else going to be doing Weight Watchers or another type of diet?  Let me know in the comments below!  Maybe we can cheer each other on and provide some support for one another along the way.

Talk to you soon!

Monday, December 9, 2013

Silly Thirty in the Test Kitchen: Skillet Lasagna

What's going on everybody?  It's another Monday - so it's another cooking post!

The last time I reported on my adventures in the test kitchen, I told you about a total flop for me with the Two-Ingredient Pancakes.  Well this time, I bring you a success story: Skillet Lasagna!  This is lasagna deconstructed - doesn't that sound all modern and hipster?


I got this recipe from Shape Magazine - they posted it on Facebook.  When I read up on what this meal would entail for prepping and cooking and saw how easy it was, I figured why not?  You can find the recipe here.  I think this is the perfect meal for a weekend when you want to stay in, but you don't want to make anything too fancy or involved.  This has cheese and carbs, so I consider this to be comfort food - perfect for the winter time.

The only thing I changed here is I used 8-oz. of a ready-made spaghetti sauce - like Prego or Ragu - instead of a no-salt added tomato sauce.  Because of that, I did not add anymore salt to the meal.  So, if you happen to make your own spaghetti or marinara sauce then use that, or if you do not have any plain tomato sauce on-hand, don't be afraid to add some spaghetti sauce from the jar and carry on with it. 

Here is the finished product:


 (Please excuse the messy stove top!)

Here is what it looked like plated with some chopped basil:


(We used the fine china for this meal.)

(Seriously though, why haven't I been topping all of my pasta dishes with some chopped basil?  *Cue Rihanna's "Where Have You Been (All My Life)"*  Between the fresh smell and the little extra it adds to the taste - my husband and I were in heaven.) 

The last thing I would say is - don't be afraid to use another kind of meat.  This recipe originally called for either 95% lean ground beef or pork.  I have lately seen in the grocery stores that they are now offering ground turkey that is pre-seasoned with Italian seasoning and chicken sausage that is also pre-seasoned the same way.  I plan to make this again, but will use either ground turkey, chicken sausage, or ground chicken with some Italian seasoning added in - I'm sure it will be just as delicious.

If you haven't already figured this one out - this meal was a big win in my house and I think it will be at your house as well.  Let me know if you try this one out, and if you have made any substitutions to the ingredients.

Take care and talk to you soon!

Wednesday, December 4, 2013

Silly Thirty Reviews: Benefit's Fakeup Concealer for the Winter

Happy Wednesday everyone!  Here is another beauty review of something that has quickly become a holy grail product for me during this cold and very dry winter: I'm talking about Fakeup from Benefit. 


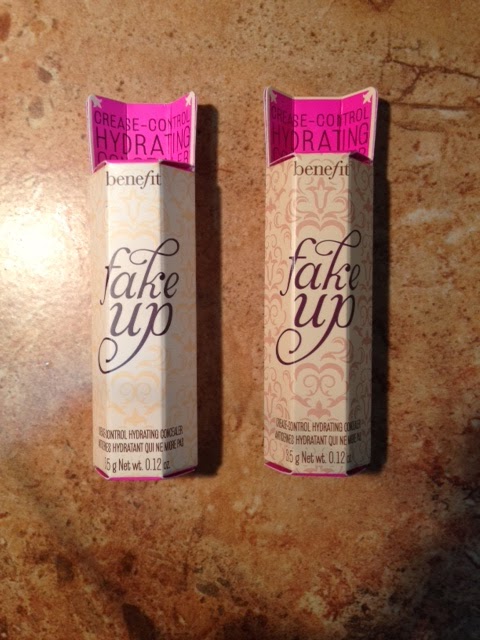
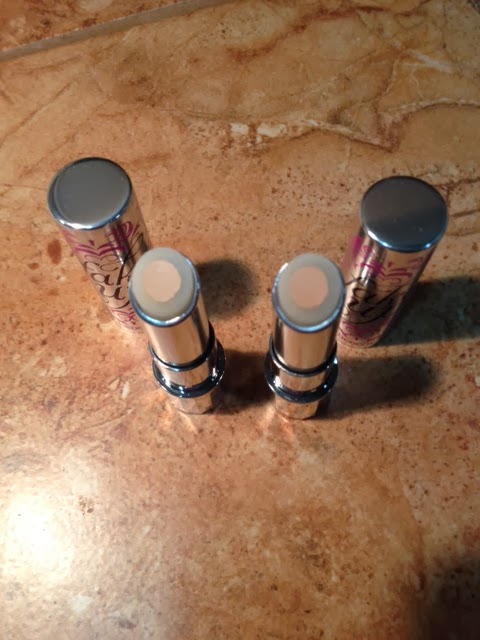
Fakeup is a concealer intended for covering darkness under the eyes.  It is a crease-control hydrating concealer that looks like nothing I have ever seen before.  The actual concealer is surrounded by a moisturizer.  Take a look:


 (Shade 01: Light is on the left and Shade 02: Medium is on the right)

When Fakeup first debuted, I had my misgivings about it.  I thought it was a gimmick.  Then, the winter weather hit.  It has been an exceptionally dry winter for me here in New York.  

My skin is already pretty dry and the concealer I was previously using - Timebalm from The Balm - while perfect for the warmer months, was emphasizing my fine lines and magnifying the crepe-factor that is going on there.  (Let me know if you would like a review of Timebalm in the comments section.)  It made me appear tired and old - not a good look.  It turns out that I need a little more of a moisture boost under the eyes for the colder weather.

I had a sample of Fakeup that I totally forgot about and "found" while getting ready one morning.  I must say, I was very impressed from the get-go.  I did not set this with powder because I knew for myself that it would totally defeat the purpose and make the area look dry and gross. 

For the duration of the day, my under eye area looked great.  It stayed moisturized throughout the day, no crepe-i-ness or fine lines emphasized.  I did not find that this stuff slid around (most likely because I needed the moisture boost so my skin was drinking this up) and it did not require any touch up.  

As far as the color range goes, it is very limited.  You have to pick between 01 light, 02 medium, and 03 dark.  Let's hope that Benefit will be coming out with some in-between shades for this concealer.  My skin tone is definitely more towards medium, but I like to blend the light and medium together for a brightened effect.

I was so impressed with the sample, that I went out and purchased the full sizes that evening at my local Ulta.  This concealer is now part of my everyday makeup routine. 

Fakeup costs about $24.00 US and you can find it online at Benefit.com; Sephora (in stores and online); Ulta (in stores and online); and a bunch of other online retailers.  If anyone else has used Fakeup - I would love to hear what you think!  Talk to you soon!

Full Disclosure (I should have been doing this with my earlier beauty posts): I purchased these products with my own money.  I did not receive any compensation of any kind in connection with this review.  These are my own opinions about this product.  I do not have any affiliation with any of the  products mentioned.  The links I have inserted are for your convenience for finding and researching these products. 

Monday, December 2, 2013

Silly Thirty Cooking: In the Test Kitchen Making Two-Ingredient Banana Pancakes

Hi everyone - hope you had a wonderful Thanksgiving! I took an unintentional and unplanned break from posting last week - so I apologize if you were wondering where I was and were missing the blog.

A couple of weeks ago, I was on Bloglovin perusing the beauty and food blogs and I saw an interesting post on pancakes, specifically banana pancakes.  I love pancakes, french toast - anything carby and delicious for breakfast.  Unfortunately, pancakes and french toast are not something I can eat too frequently because I would have to start wearing clothes about 10 sizes larger than what I already wear.  But getting back...

The Black Pearl Blog, operated by a woman with lovely looking eyebrows named Sandra who hails from Glasgow, had this post last month on her recipe for "Healthy Two Ingredient Banana Pancakes."  You can check out her and her banana pancake post right here.  Much like the title of the recipe would suggest, the recipe calls for two ingredients - bananas and eggs.  Needless to say, I was intrigued especially considering the fact that bananas and eggs alone are, by far, much healthier than traditional pancakes.

So one Saturday morning a couple of weeks ago when I was mulling over what to eat for breakfast, I decided to give this recipe a go.  I mean how hard could it be?  Heh - well, let's put it this way people: I wouldn't be telling you about this little experiment unless a) it was totally delicious or b) it was a complete and total disaster and I couldn't resist giving you the opportunity to have a chuckle about it with me.  Can you guess what happened here?

Now before we begin, I want to say that I set the bar pretty low for myself in terms of how well I thought this would turn out.  I did not think that these two ingredient pancakes were going to taste just like regular pancakes - it would have been ridiculous to think that way.  I thought that if I could get the consistency right - more or less similar to a traditional pancake - then maybe this would become part of my breakfast cooking repertoire.   

So here is how I started:


Black Pearl Sandra, as I will call her for the purposes for this post, suggested adding a little vanilla extract or cinnamon to sweeten things up a bit.  

I thought I had a photo of the bowl with the egg and banana mixture - guess not.  Here is the mixture in a measuring cup which I thought would help with my pour of this concoction onto the pan:


I modified the recipe by adding another banana into the mix.  When I initially mixed everything together, it looked too much like eggs with banana blended in.  (I know, I know...)

Here is the first pancake, mid-cook:


Black Pearl Sandra said you can flip it over once it starts to bubble, much like traditional pancakes.  So that is what I did and here is what happened:

The one thing about these pancakes is that patience is key.  They are to be cooked in low/medium heat, you need to let them sit there and cook, and just when you think these are ready to flip, just leave them on a little bit longer and then flip them over. 

Black Pearl Sandra also suggested adding some baking powder if you wanted a fluffier pancake.  And who wouldn't want a fluffier pancake?  So I took a look in my pantry, but I did not see any baking powder.  I did find some cornstarch though, and figured at that this point: why the heck not?


 (Big shout out to Ben Affleck for making a wonderful little film about the true story of the rescue of six U.S. diplomats from Tehran, Iran during the 1979 Iran hostage crisis.) 

This is what the final product looked like:

Yea I know, it looks like an omelet with mashed banana in there.  And it more or less tasted the same way, corn starch and vanilla extract be damned.  

Funnily enough, later that morning while at the chiropractor, I found the following post on instagram from Blogilates: 
 
 
Will I try this again?  Most likely I will - I do have a blender so I can do a second try with the aforementioned suggestion.  I wonder if omitting the egg yolks would make a difference and add some fluffiness to consistency?  There is only one way to find out!

Have any of you tried the Two-Ingredient Pancakes?  Please share in the comments section below if you have.  

Talk to you soon!! xoxo


Wednesday, November 20, 2013

The Silly Thirty Drug Store Round Up

Hello everybody!  Welcome back to Silly Thirty!

I've been visiting my local drug stores more frequently than usual due to the fact that I have been sick.  The bad part is I have had to spend some money on medicine.  The good part is I got to check out what was happening in the cosmetic sections of each store!!!

Here is a picture of everything I have purchased recently:


I won't be reviewing these products in this post - let me know if you would like a product review on anything featured here.  I just thought it would be nice to share my "mini-haul".

When I went into Harmon Face Value, I came upon a small display of e.l.f. products.  For those of you who do not know, e.l.f. stands for "eyes lips face".  They had an array of things (from makeup brushes to lipstick to tinted moisturizers) and everything cost under $10.  The products I purchased were $3.00 a piece - you can't beat that price!  I'm not sure about the rest of you, but this is the first time I have seen e.l.f. at Harmon Face Value - I usually only see this makeup line at Target or Walgreens.  

Here is a closer look at the baked eyeshadows: 


(e.l.f. studio baked eyeshadow: bark & toasted)


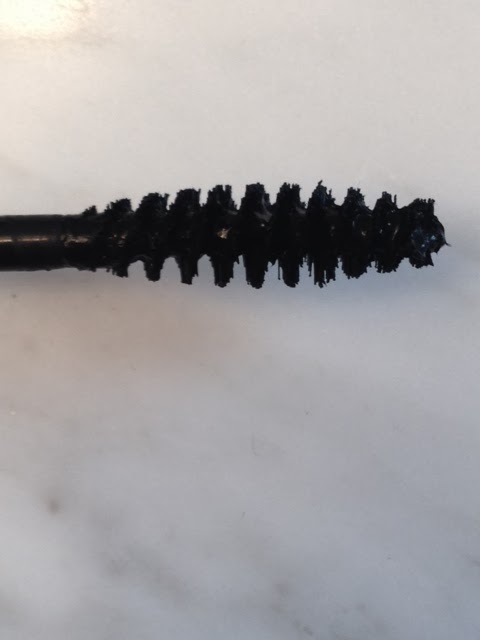
The mascara wand on the e.l.f. mascara appealed to me on first glance, so I figured I would give this guy a chance. (Hey - that rhymed!)  We shall see how well this performs...


(e.l.f. studio lengthening & volumizing mascara)

And finally from e.l.f., who can go wrong with some makeup wipes?


(e.l.f. studio makeup remover cleansing cloths)

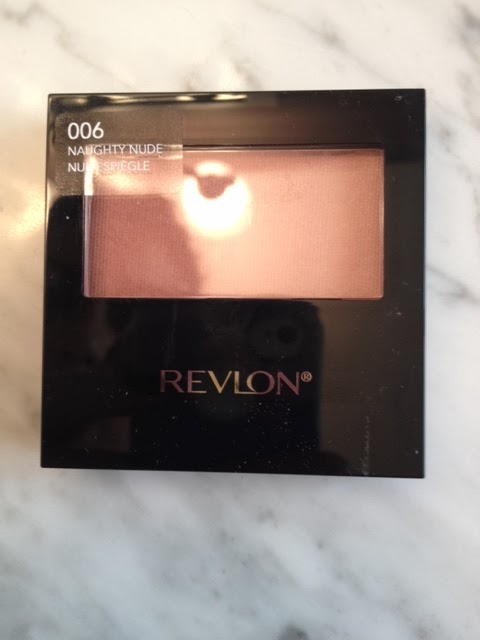
While I love Revlon's lip products (I swear I have been on a Revlon kick lately) and some of their face products, I have never really delved into their eyeshadows or blushes.  I saw these blushes, which appear to be new since they were on a separate promotional display, so I thought this would be the perfect opportunity to try them.  Also, I have been in the market for a soft pink shade and a nude shade for everyday wear.

Take a look...


 (revlon powder blush with brush: naughty nude & oh baby! pink)

Since writing up this post, I have actually tried both blush shades - they are very pretty colors that will give you a soft glow.  Not overly shimmery so they are perfect for daytime wear.  The pigmentation is just OK - I had to go back in a couple of times with my brush to get the desired effect of a slightly flushed cheek.  I was not impressed with the staying power either, especially when you compare it to, say Tarte's Amazonian Clay 12-Hour Blush.  


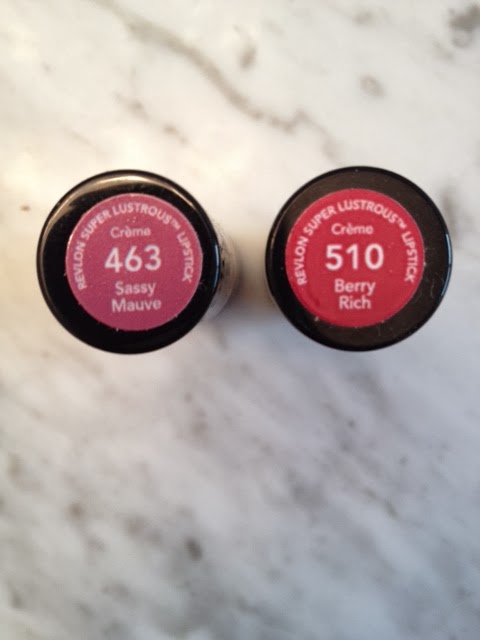
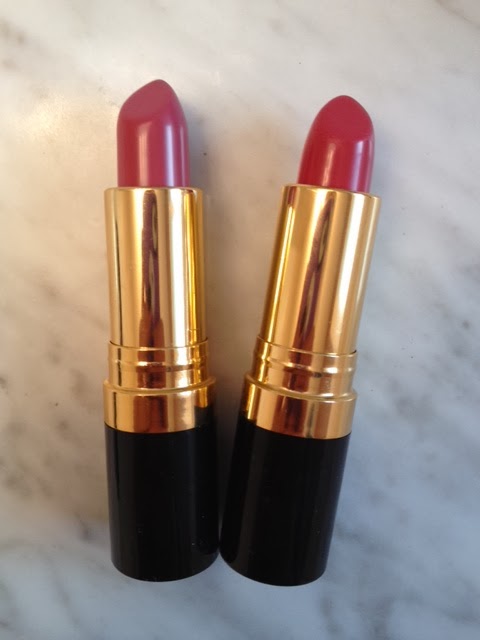
Here are two Revlon Super Lustrous lip sticks I picked up during a trip to Ulta.  I don't think these are new colors - they appear to be part of the regular line of colors.


 (sassy mauve)

 (berry rich)


I bought Sassy Mauve based upon a recommendation from Camila Coelho - she is a gorgeous beauty guru on YouTube and she recently made a video on her Favorite Fall Lipsticks that included this color.  I picked up Berry Rich on a whim since it is gorgeous and appears to be extremely wearable as well.

And now, on to more blushes - this time from Milani.  These are Milani's Baked Powder Blushes:


(luminoso)

(dolce pink)

I have been very curious about Milani blushes for a while.  I have read lots of positive reviews online and seen plenty of makeup tutorials on YouTube that feature these blushes.  When I saw the "buy one get one 50% off" promotion at CVS, I couldn't resist picking up two shades.

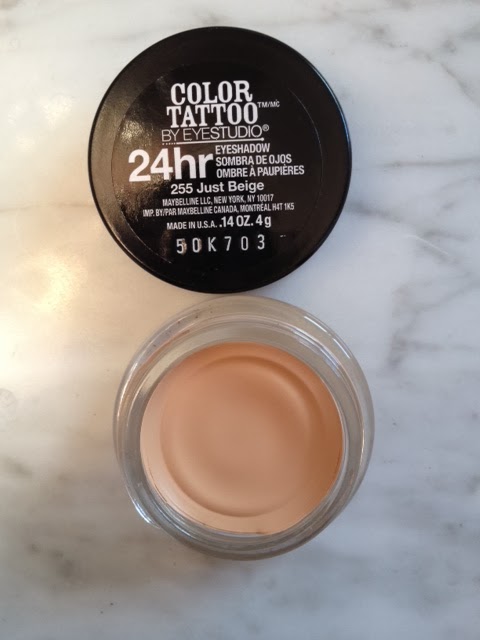
Last, are the Maybelline Color Tatoos:


These shades - Just Beige and Nude Pink - are limited edition, so if you are interested in these - walk, don't run to the store and buy them before they are sold out for good.  I found these at CVS.  The colors are pretty neutrals that you can use alone, or as a base for your eye look.  I have heard that these Color Tattoos are a good dupe for the MAC Paint Pots and Sigma Eyeshadow Bases.

I hope you enjoyed a peek in my makeup shopping bag!  See you next time!

Monday, November 18, 2013

Silly Thirty Discusses Fad Fruits and Vegetables: Kale Edition

Hello all!  Hope everyone had a great weekend!

I was at the grocery store the other day and I started to think about all of the foods that have come in and out of "style".  Food is almost like fashion in a sense.  There always seems to be something to eat that is "so hot right now" - ala Hansel from Zoolander.  (I'm totally showing my age with that reference.)

These foods are popularized and hyped up, but I feel like the nutritional facts and information about why these things are so good for you can get glossed over most of the time.  All you know is that, according to some word of mouth or something you saw or read in the news, that [insert food here] is what you should be eating at the moment.

I thought it would be nice to start a "series" about fad fruits and veggies and feature information in a digestible (wocka wocka Fozzy Bear) format - just some bullet points with basic information.  To start off the series, I chose kale because it appears to be the "cool kid" of the moment.  Also, because I have actually tried this stuff and really like it, so I have no qualms recommending it and telling you that this leafy green lives up to the hype.

Say hello to kale:


freshly harvested whole kale cabbage on a white background Stock Photo - 15463048


What do we know about kale?  Well, from the photo above we can tell that kale is a leafy green, and its name sounds like it belongs to something that was found at the bottom of the ocean (Or maybe I am thinking of kelp?  I digress.).  But what can kale do for you?

  • Kale is in the Brassica family, which is a group of veggies that also includes cabbage, collard greens, and brussels sprouts.  Kale is a descendant of wild cabbage.
  • Kale is rich in vitamin A - one cup of kale contains 10,302 IU of it.
  • Kale is also a good source for vitamin C offering 80.4 mg per cup. 
  • Kale is a great source for vitamin K. 
  • Kale contains high amounts of sulfur and fiber. 
  • One cup of kale contains 121 milligrams of omega-3 fatty acids and 92.4 milligrams of omega-6 fatty acids. These essential, polyunsaturated fats contain anti-inflammatory properties and support brain function.
  •  Per calorie, kale contains more iron than beef and more calcium than milk.

(Information on kale was found at the following websites: http://spiritfoods.net/health-benefits-of-kale/ and http://www.whfoods.com/genpage.php?tname=foodspice&dbid=38)

The best way - for me - to describe the flavor of kale is to compare it to spinach.  Spinach - cooked and uncooked - has a soft and mild flavor.  In my opinion, it really does not taste like anything in particular.   Uncooked, kale has a bitter flavor but when it is cooked becomes milder and sweeter.

The first time I had kale, I decided to prepare it much the same way I do with spinach - sauteed in a pan with a drizzle of olive oil, garlic, salt, and pepper.  I actually prefer kale to spinach when cooked this way because it doesn't cook down or wilt too much, the way spinach does.  The leaves stay curly and keep their shape for the most part.  The taste of cooked kale is a little sweeter as compared to cooked spinach. 

I have also added kale to my smoothies.  While this tasted very good as well, you have to watch your portions and make sure there are very sweet tasting fruits, like banana, included in the smoothie.  Otherwise, everything ends up tasting a little too much like kale.  Also, I recommend that you immediately soak the blender pitcher in hot water to ensure that none of the pesky little kale bits stick to the sides of the blender.

If I incorporate raw kale with other salad greens, then I make sure to chop up the salad in order to better distribute the kale.  That way, I don't end up with mouthfuls of bitter kale greens that I want to douse in salad dressing. 

A co-worker of mine added chopped kale to a sausage and white bean soup - she said it was delicious.  Keep kale in mind as an ingredient option if you decide make some soup this week or in the near future.

So that's it!  I hope you found this little blurb on kale informative and that it has inspired you to give kale a try the next time you see it in the grocery store or at a restaurant.

Take care and talk to you soon!